vSphere + OpenShift UPI(User Provisioned Infrastructure)
vCenter에 OpenShift를 UPI 방식으로 설치하는 과정입니다.
RECA4기 기한별 https://whoslook.tistory.com/
,박지원,박효승,이명희님의 자료 입니다.
목차
1.OpenShift UPI 설치 구성환경
1-1. 서버 스펙
1-2. 가상머신 스펙
2.OpenShift UPI 설치 구성도
3.OpenShift UPI 설치 순서
3-1. LB, HTTP 구성
3-2. DNS 구성
3-3. Bootstrap 구성
3-4. Master1,2,3 구성
3-5. Bootstrap-Complete 실행
3-6. Worker1,2 구성
3-7. Install-Complete 실행
3-8. CentOS Chrome 설치
4.Troubleshooting
1.OpenShift UPI 설치 구성 환경
1-1. 서버 스펙
· 모델: PowerEdge R630
· 프로세서: Inter(R) Xeon(R) CPU E5-2680 v3 @ 2.50GHz
· 논리 프로세서: 48
· NIC: 6
· 하이퍼바이저: VMware ESXi 7.0.3
1-2.가상머신 스펙
LB, HTTP
· CPU: 2
· 메모리: 4GB
· 하드디스크: 50GB
· 네트워크 어댑터: External
· OS: CentOS8-DVD
DNS
· CPU: 2
· 메모리: 4GB
· 하드디스크: 50GB
· 네트워크 어댑터: External
· OS: Windows Server 2019
Bootstarp
· CPU: 4
· 메모리: 16GB
· 하드디스크: 120GB
· 네트워크 어댑터: External
· OS: RHCOS 4.13
Master1,2,3
· CPU: 4
· 메모리: 16GB
· 하드디스크: 120GB
· 네트워크 어댑터: External
· OS: RHCOS 4.13
Worker1,2,3
· CPU: 4
· 메모리: 16GB
· 하드디스크: 120GB
· 네트워크 어댑터: External
· OS: RHCOS 4.13
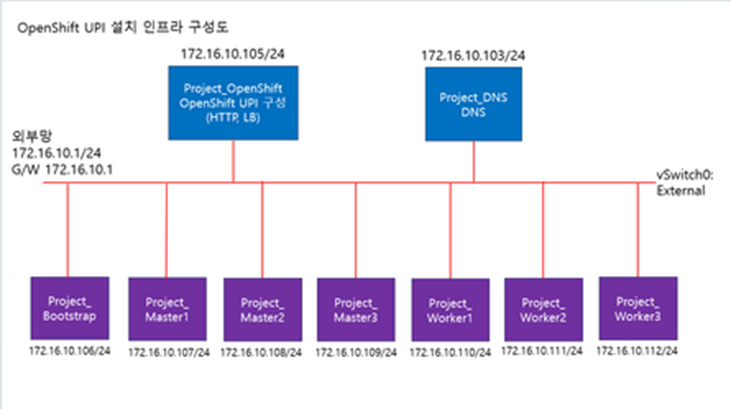
2.OpenShift UPI 설치 구성도
3.OpenShift UPI 설치 순서

3.1. LB, HTTP 구성
3.1.1. Network 설정
# vi /etc/sysconfig/network-scripts/ifcfg-ens192

TYPE=Ethernet
BOOTPROTO=static
NAME=ens192
DEVICE=ens192
ONBOOT=yes
IPADDR=172.16.10.105
PREFIX=24
GATEWAY=172.16.10.1
DNS1=172.16.10.103
DNS2=168.126.63.1
:wq

# systemctl restart NetworkManager.service
3.1.2. Apache 설치
- 8080 포트로 설정: 로드밸런서 tcp/80port 사용, 80포트가 아닌 다른 포트로 구성.
# yum install -y httpd
# vi /etc/httpd/conf/httpd.conf

Listen 80 -> Listen 8080
:wq

# systemctl enable --now httpd
3.1.3. HAproxy 설치
# yum update && yum install -y haproxy
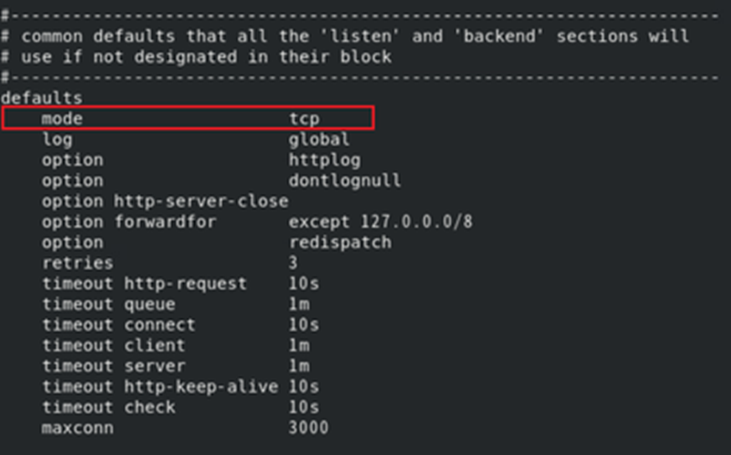
# vi /etc/haproxy/haproxy.cfg
defaults
mode tcp
log global
option httplog
option dontlognull
option http-server-close
option forwardfor except 127.0.0.0/8
option redispatch
retries 3
timeout http-request 10s
timeout queue 1m
timeout connect 10s
timeout client 1m
timeout server 1m
timeout http-keep-alive 10s
timeout check 10s
maxconn 3000
#---------------------------------------------------------------------
# static backend for serving up images, stylesheets and such
#---------------------------------------------------------------------
backend static
balance roundrobin
server static 127.0.0.1:4331 check
#---------------------------------------------------------------------
# round robin balancing between the various backends
#---------------------------------------------------------------------
frontend kubernetes_api
bind 0.0.0.0:6443
default_backend kubernetes_api
option tcplog
backend kubernetes_api
balance roundrobin
server bootstrap bootstrap.team4.team4.local:6443 check
server master1 master1.team4.team4.local:6443 check
server master2 master2.team4.team4.local:6443 check
server master3 master3.team4.team4.local:6443 check
server worker1 worker1.team4.team4.local:6443 check
server worker2 worker2.team4.team4.local:6443 check
server worker3 worker3.team4.team4.local:6443 check
frontend machine_config
bind 0.0.0.0:22623
default_backend machine_config
option tcplog
backend machine_config
balance roundrobin
server bootstrap bootstrap.team4.team4.local:22623 check
server master1 master1.team4.team4.local:22623 check
server master2 master2.team4.team4.local:22623 check
server master3 master3.team4.team4.local:22623 check
server worker1 worker1.team4.team4.local:22623 check
server worker2 worker2.team4.team4.local:22623 check
server worker3 worker3.team4.team4.local:22623 check
frontend router_https
bind 0.0.0.0:443
default_backend router_https
backend router_https
balance roundrobin
server master1 master1.team4.team4.local:443 check
server master2 master2.team4.team4.local:443 check
server master3 master3.team4.team4.local:443 check
server worker1 worker1.team4.team4.local:443 check
server worker2 worker2.team4.team4.local:443 check
server worker3 worker3.team4.team4.local:443 check
frontend router_http
bind 0.0.0.0:80
default_backend router_http
backend router_http
balance roundrobin
server master1 master1.team4.team4.local:80 check
server master2 master2.team4.team4.local:80 check
server master3 master3.team4.team4.local:80 check
server worker1 worker1.team4.team4.local:80 check
server worker2 worker2.team4.team4.local:80 check
server worker3 worker3.team4.team4.local:80 check
# systemctl enable --now haproxy3.1.4. 방화벽 포트 허용
# firwall-cmd --permanent --add-port=80/tcp
# firwall-cmd --permanent --add-port=443/tcp
# firwall-cmd --permanent --add-port=6443/tcp
# firwall-cmd --permanent --add-port=22623/tcp
# firwall-cmd --permanent --add-port=53/{tcp,udp}
# firwall-cmd --permanent --add-port=8080/tcp
# firwall-cmd --reload
3.1.5. SELinux Enforcing일 경우
# semanage port -a -t http_port_t -p tcp 6443
# semanage port -a -t http_port_t -p tcp 22623
# semanage port -l | grep http_port_t
3.1.6. SSH 키 생성
# ssh-keygen -q -N ''3.1.7. OpenShift-Installer 설치
# wget https://mirror.openshift.com/pub/openshift-v4/x86_64/clients/ocp/stable/openshift-install-linux.tar.gz
# wget https://mirror.openshift.com/pub/openshift-v4/x86_64/clients/ocp/stable/openshift-client-linux.tar.gz

-> 로컬에서 pull-secret 다운로드 후 scp로 Bastion에 파일 옮겨주기
# https://console.redhat.com/openshift/install/pull-secret

# tar xvf openshift-install-linux.tar.gz -C /usr/local/bin/
# tar xvf openshift-client-linux.tar.gz -C /usr/local/bin/

# mkdir -p /root/ocp/config

# vi ocp/config/install-config.yaml

-> install-config.yaml 내용 수정
-> pullsecret,ssh-key 복사 해서 yaml 파일에 넣어주기

apiVersion: v1
baseDomain: team4.local
compute:
- hyperthreading: Enabled
  name: worker
  replicas: 2
controlPlane:
  hyperthreading: Enabled
  name: master
  replicas: 3
metadata:
  name: team4
networking:
  clusterNetwork:
  - cidr: 10.128.0.0/14
    hostPrefix: 23
  networkType: OpenShiftSDN
  serviceNetwork:
  - 172.30.0.0/16
platform:
  none: {}
fips: false
pullSecret: ''
sshKey: ''


# cd /usr/local/bin
# openshift-install create manifests --dir=/root/ocp/config/

-> 노드간의 시간 동기화 작업은 manifests 생성 후, ignition 생성 전에 진행
# vi /root/chrony.conf

-> chrony.conf 내용 수정

server time.bora.net iburst
stratumweight 0
driftfile /var/lib/chrony/drift
rtcsync
makestep 10 3
bindcmdaddress 127.0.0.1
bindcmdaddress ::1
keyfile /etc/chrony.keys
commandkey 1
generatecommandkey
noclientlog
logchange 0.5
logdir /var/log/chrony

-> chrony.conf의 base64 인코딩 값 확인
# base64 /root/chrony.conf

-> chrony-configuration.yaml 파일 master, worker 각각 생성
# vi /root/99_{masters,workers}-chrony-configuration.yaml

apiVersion: machineconfiguration.openshift.io/v1
kind: MachineConfig
metadata:
  creationTimestamp: null
  labels:
    machineconfiguration.openshift.io/role: {master,worker}
  name: 99-master-etc-chrony-conf
spec:
  config:
    ignition:
      config: {}
      security:
        tls: {}
      timeouts: {}
      version: 3.1.0
    networkd: {}
    passwd: {}
    storage:
      files:
      - contents:
          source: data:text/plain;charset=utf-8;base64,[base64 인코딩 값 넣기]
        group:
          name: root
        mode: 420
        overwrite: true
        path: /etc/chrony.conf
        user:
          name: root
  osImageURL: ""

-> chrony-configuration.yaml 파일을 OpenShift 디렉토리에 복사
# cp /root/99_{masters,workers}-chrony-configuration.yaml /root/ocp/config/openshift/

# openshift-install create ignition-configs --dir=/root/ocp/config/

# mkdir /var/www/html/ign
# cp /root/ocp/config/*.ign /var/www/html/ign/
# chmod 777 /var/www/html/ign/*.ign

# systemctl restart httpd
3.2. DNS 구성 순서
1. windows 기본 설정 진행 및 ip 설정, 컴퓨터 이름 설정
2. 관리 → 역할 및 기능 추가
3. DNS 서버 설치
4. 도구 → DNS
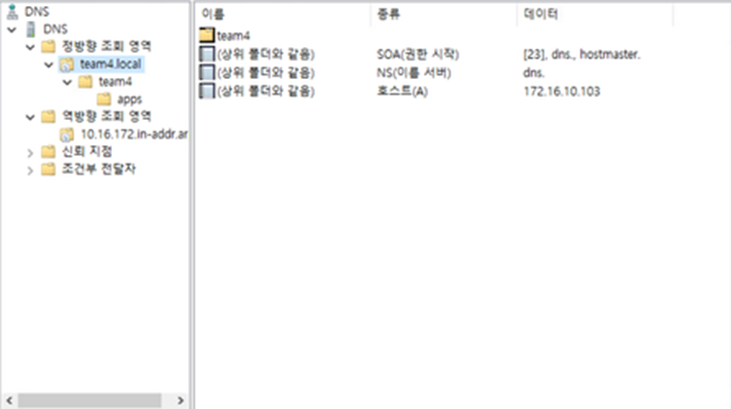
5. 정방향 조회 영역 우클릭 후 새영역 team4.local 생성
6. 역방향 조회 영역 우클릭 후 새영역
7. 172.16.10. 입력 후 생성
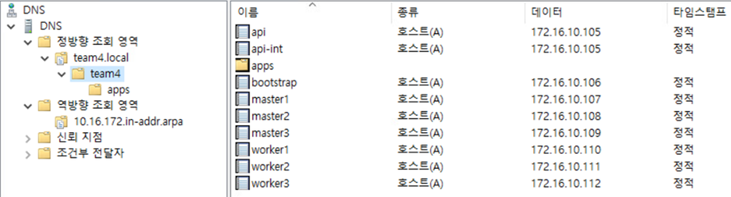
8. 호스트 추가


3.3. Bootstrap 구성
- RHCOS 4.13 설치
3.3.1. Network 설정
# nmtui
-> Edit a connection
ipv4 address 172.16.10.106/24
gateway 172.16.10.1
dns 172.16.10.103

-> Active a connection
-> <Deactivate> -> <Enter 두 번>
3.3.2. Hostname 확인
# hostname3.3.3. Ignition 설치
# coreos-installer install --ignition-url=http://172.16.10.105:8080/ign/bootstrap.ign /dev/sda \
--insecure-ignition --copy-network
3.3.4. 재부팅
# reboot3-4. Master1,2,3 구성
- RHCOS 4.13 설치
3.4.1. Network 설정
# nmtui

-> Edit a connection
ipv4 address 172.16.10.{107,108,109}/24
gateway 172.16.10.1
dns 172.16.10.103

-> Active a connection
<Deactivate> -> <Enter 두 번>
3.4.2. Hostname 확인
# hostname3.4.3. Ignition 설치
# coreos-installer install --ignition-url=http://172.16.10.105:8080/ign/master.ign /dev/sda \
 --insecure-ignition --copy-network
3.4.4. 재부팅
# reboot3.5. Bootstrap-Complete 실행
- LB, http에서 실행
# export KUBECONFIG=/root/ocp/config/auth/kubeconfig

-> Master1,2,3 'Not Ready'가 'Ready'로 바뀔 때까지 확인
# oc get nodes

-> Master node가 'Ready'로 바뀌면 아래 명령어 실행
# chmod 600 /root/.ssh/id_rsa

-> Master1,2,3 ssh접속
# ssh -i /root/.ssh/id_rsa core@172.16.10.{107,108,109}

-> Timezone 변경
# timedatectl set-timezone Asia/Seoul

-> NTP 서버 동기화 확인
# systemctl status chronyd
# exit

# ./openshift-install wait-for bootstrap-complete  --log-level=info --dir=/root/ocp/config/
3.6. Worker1,2,3 구성
- RHCOS 4.13 설치
3.6.1. Network 설정
# nmtui

-> Edit a connection
ipv4 address 172.16.10.{110,111,112}/24
gateway 172.16.10.1
dns 172.16.10.103

-> Active a connection
<Deactivate> -> <Enter 두 번>
3.6.2. Hostname 확인
# hostname
-> DNS에 등록된 Cluster와 HOST명 출력되어야 정상임
3.6.3. Ignition 설치
# coreos-installer install --ignition-url=http://172.16.10.105:8080/ign/worker.ign /dev/sda \
--insecure-ignition --copy-network
3.6.4. 재부팅
# reboot3-7. Install-Complete 실행
-> oc get csr 확인후 pending 상태를 approve로 바꿔 줘야함
# oc get csr

# cd /usr/local/bin/
# vi csr.sh

-> csr.sh 파일 내용 수정
#!/bin/bash
#Loop through CSR names starting whit "csr-"
for csr_name in $(oc get csr | grep -o '^csr-[a-zA-Z0-9]*'); do
    # Approve the CSR
    oc adm certificate approve "$csr_name"
done

-> 스크립트 실행
# sh csr.sh

-> oc get csr로 'Pending'이 'Approve' 변경 되었는지 확인
# oc get csr

-> Worker1,2,3 ssh접속
# ssh -i /root/.ssh/id_rsa core@172.16.10.{110,111,112}

-> Timezone 변경
# timedatectl set-timezone Asia/Seoul

-> NTP 서버 동기화 확인
# systemctl status chronyd
#exit

-> Install-Complete 실행
./openshift-install wait-for install-complete --dir=/root/ocp/config/ --log-level=debug
3-8. CentOS Chrome 설치
- Bastion에서 설치
- Install-Complete가 끝나면 Openshift Console 주소로 접속 후 확인
# wget https://dl.google.com/linux/direct/google-chrome-stable_current_x86_64.rpm
# yum localinstall google-chrome-stable_current_x86_64.rpm
4.Troubleshooting
4-1. http: server gave HTTP response to HTTPS client

발생원인: 로드밸런서가 ‘tcp 로드밸런서’가 아닌 ‘http 로드밸런서’를 사용했을 경우 발생
해결방법: 사용중인 로드밸런서를 ‘tcp 로드밸런서’로 변경
· haproxy 사용자의 경우 haproxy.cfg 파일에서 mode http → mode tcp로 변경
RECA4기 4Team 분들 고생하셨습니다.
Have a nice day!